There are some decidedly Zen-like paradoxes to practicing almost any form of agile methodology. People practice agile everywhere, yet they have a hard time finding it at work. It’s the most natural form of technical project management I’ve experienced, yet people seem determined to make it harder than it is and over-think the principles. And when they shift toward simplifying their agile practice, they go contrary to good advice that everything should be made as simple as possible, but not simpler.
So a challenge: Before the month is out, take a moment to reflect on some important task you completed that had nothing to do with work and see how many things you did reflect an agile principle or common practice. Maybe it’s work you did on a hobby or at a volunteer gig. Perhaps it involved some kitchen wizardry, a tactful communication maneuver with your children, or routine house maintenance. Did you iterate across several possible solutions until you found success? Did you decide to decide something later so that you could gather more information? Did you take a particular task to “good enough” so that you could complete a more urgent related task? And which of your insights can you bring into work with you?
In this article I’ll describe a recent experience with Agile in the Wild and the lessons that can be applied in your work environment.
The challenge was how to put two 90 degree bends across a 10 inch arch in a 12 foot long, quarter inch thick piece of red oak (1) for the edge of a breakfast nook table. To do this I had to work out a way to bend long pieces of wood without having to mess with the need for a super extra-large steam box. The idea came from a shipwright named Louis Sauzedde. His trick is to use heavy poly tubing (2) to steam-bend wood in place rather than use a traditional steam box. The advantage is that the wood doesn’t cool when transferring from a steam box to a jig and, best of all for small shops, you don’t have to take up space storing a large steam box. Version 1 of my steam kettle was built using an outdoor propane burner (3), a re-purposed brew kettle (4), an oil drip pan (5), PVC piping (6), a radiator hose (7) for positioning, and the unfinished table top (8) as a jig.
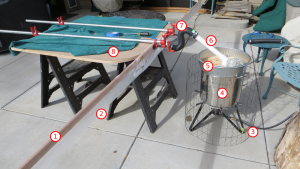
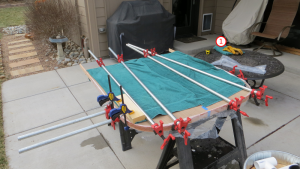
#6 was a mistake. The PVC worked, but didn’t hold up to the heat. It didn’t exactly melt, but it definitely didn’t hold shape over the hour long steaming process. #8 was a big mistake. Concern about damaging the walnut top made set-up longer than it needed to be and I couldn’t get the clamps where I needed them. I was trying to take a shortcut and not hassle with making a proper jig. Oh, and another piece of important advice. Always, always, ALWAYS be wearing a good pair of work gloves (1). All parts of the steam system – burner to kettle to steam pipe to radiator hose to poly tubing to wood – are HOT and more than likely something will slip during clamping and you’ll have to grab hold. Not much fun with bare hands.
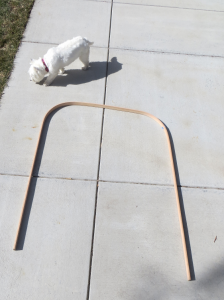
The end result was a not-quite-bent-enough piece of wood (Westie terrier, “Rose,” for scale.) The wood needed to be steamed again.
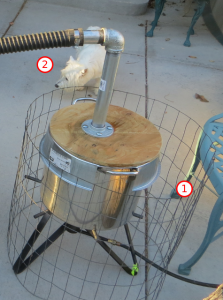
Version 1 of the steamer was modified such that the drip pan was flipped (1) for a better seal on the kettle, metal piping (2) replaced the PVC, and a more flexible radiator hose (3) was used for easier positioning. Version 2 of the steamer was a significant improvement. I got better steam output from this rig so the lignin in the wood was a little easier to bend in a shorter amount of time. Most importantly, a throw-away jig (4) was built for much better clamping.
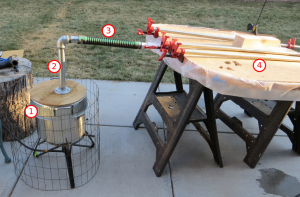
Must have safety feature: An anti-curious-dog flame guard made out of sheep fence (1). Curious dog (2) optional.
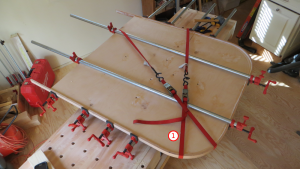
After bending and clamping in place the steam was removed, the plastic cut away, and the wood left in the shop until I had free time to unclamp the oak from the jig. With the jig I was able to clamp the wood at multiple places across the arc. And no worries about damaging the expensive walnut of the actual table top.
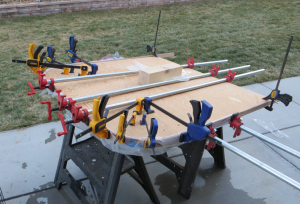
Back in the shop, the edge is glued, clamped, and left to set after dealing with an unexpectedly uncooperative bend that shows signs of having been cut from stock near a knot (1).
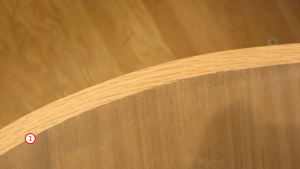
A day to set, a lot of edge routing, and a bit of sanding shows the end result: Near-perfect 90 degree bends. I was also able to remove a little bit of twist that was occurring in the wood thanks to the better steam output from Kettle 2.0 and the use of multiple smaller clamps across the arc. The final unfinished result shows a tight fit between the edging and the table (1).
Agile Lessons
- Get help. Someone already knows the solution you seek, or most of it anyway.
- Short cuts are often the long way to get to where you are going.
- The MVP: Goes together fast, is cheap, built just good enough to actually test in the wild (safely, I would add.)
- Reuse existing assets that are adapted to suit the current need (Can equipment used for brewing beer be used in fine woodworking? Absolutely! All you have to do is think outside the brew kettle.)
- The Jig: It isn’t part of the final product. In all likelihood it won’t ever be used again. Was it waste or an essential part of getting to the final product? Design flow diagrams and wireframes are analogous to jigs. You’re supposed to throw them away! Think how utterly horrific our final products would be if we included all the interim work in what we delivered to the client.
